Author:
erics , Posted on Tuesday, May 9th, 2023 at 9:55:13am
I have been using RSA SSH keys forever to login to my various AWS EC2 instances.
With macOS Ventura 13.3.1 ssh failed with the “Permission Denied” error. Using ssh -vvv, I saw that the RSA key was now being rejected.
After much research, I decided to implement new keys on the client (Ventura) side using ed25519, like this:
cd ~ / . ssh
ssh - keygen - t ed25519
cat id_ed25519 . pub
I then placed the new id_ed25519.pub contents into the ~/.ssh/authorized_keys files on the target nodes, and everything started working!
How-To's , Technology Tags: AWS , denied , ed25519 , Error , Generate , howto , key , Linux , MacOS , Permission Denied , public , Public Key , ssh , ssh-keygen , sshd , tips , Ventura No comments
Author:
erics , Posted on Friday, May 5th, 2023 at 12:59:06pm
I have a new iMac running macOS Ventura 13.3.1.
I tried to rsync some files from another host and got the following error:
rsync - av -- progress -- exclude = Recordings / neptune : / Users / erics / Documents / / var / root / tmp / Documents /
receiving file list . . .
rsync : opendir "/Users/erics/Documents/." failed : Operation not permitted ( 1 )
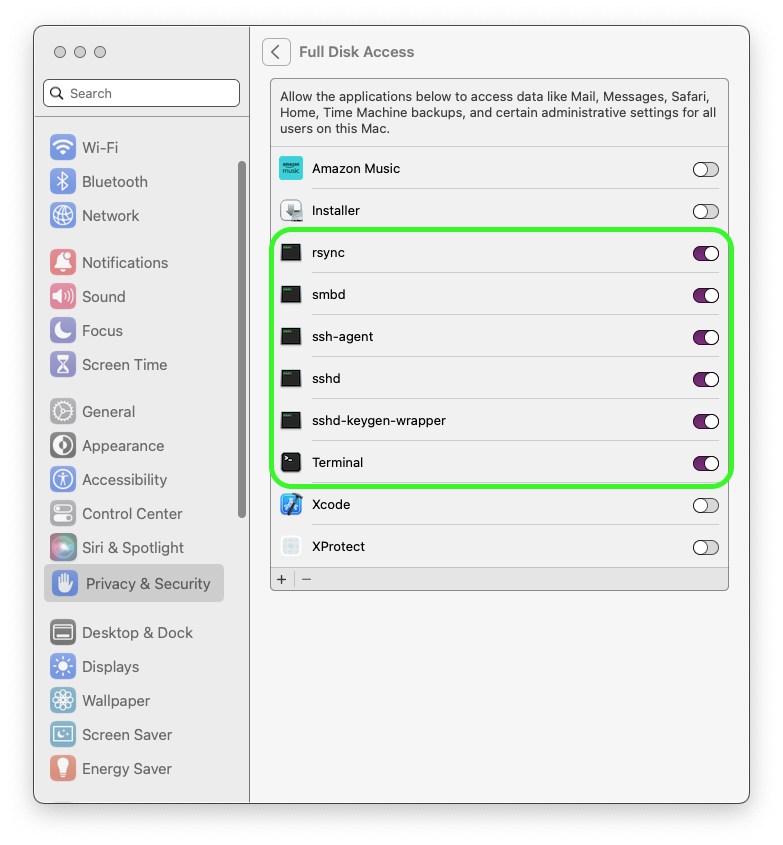
In order to get rsync to have access to the hard drive in macOS Ventura, you need to add rsync and other programs to the Full Disk Access panel under Privacy & Security in System Settings.
Next locate Privacy & Security at the bottom of the same block as General in the left menu bar and click on itusr directory, select it, then select bin. Finally, drag & drop the rsync command into the Full Disk Access window in true Apple style.
This is the list of files to add via Drag & Drop to the Full Disk Access panel under Privacy & Security:
/ Applications / Utilities / Terminal . app
/ usr / sbin / sshd
/ usr / sbin / smbd
/ usr / bin / ssh - agent
/ usr / bin / rsync
/ usr / libexec / sshd - keygen - wrapper
How-To's , Technology Tags: apple , howto , Mac , MacOS , Privacy , rysnc , security , ssh , sshd , tips , Ventura No comments
Author:
erics , Posted on Tuesday, May 2nd, 2023 at 7:14:02am
Death , Entertainment Tags: death , Gordon , Lightfoot , Rip No comments
Author:
erics , Posted on Monday, April 17th, 2023 at 9:51:50am
First, use the AWS Console to modify the volume to the desired size, in our example we want to go from 10GB to 25GB for the root filesystem
For a Xen ext4 root volume
1
2
3
4
5
6
7
8
9
10
11
12
13
14
15
16
17
18
19
20
21
22
23
24
25
26
27
28
29
30
31
# df -h
Filesystem Size Used Avail Use % Mounted on
/ dev / xvda1 9.8G 9.6G 26M 100 % /
/ dev / xvdf 200G 99G 102G 50 % / volumes / data
# lsblk
NAME MAJ : MIN RM SIZE RO TYPE MOUNTPOINT
xvda 202 : 0 0 10G 0 disk
└─xvda1 202 : 1 0 10G 0 part /
xvdf 202 : 80 0 200G 0 disk / volumes / data
# growpart /dev/xvda 1
CHANGED : disk = / dev / xvda partition = 1 : start = 4096 old : size = 20967390 , end = 20971486 new : size = 52424670 , end = 52428766
# lsblk
lsblk
NAME MAJ : MIN RM SIZE RO TYPE MOUNTPOINT
xvda 202 : 0 0 25G 0 disk
└─xvda1 202 : 1 0 25G 0 part /
xvdf 202 : 80 0 200G 0 disk / volumes / data
# resize2fs /dev/xvda1
resize2fs 1.43.5 ( 04 - Aug - 2017 )
Filesystem at / dev / xvda1 is mounted on / ; on - line resizing required
old_desc_blocks = 1 , new_desc_blocks = 2
The filesystem on / dev / xvda1 is now 6553083 ( 4k ) blocks long .
# df -hT
Filesystem Type Size Used Avail Use % Mounted on
/ dev / xvda1 ext4 25G 9.6G 15G 40 % /
/ dev / xvdf xfs 200G 99G 102G 50 % / volumes / data
For NVMe
First, use lsblk to see the raw partitions:
# df -hT
Filesystem Type Size Used Avail Use % Mounted on
/ dev / nvme0n1p1 xfs 20G 2.8G 18G 14 % /
# lsblk
NAME MAJ : MIN RM SIZE RO TYPE MOUNTPOINT
nvme0n1 259 : 0 0 40G 0 disk
├─nvme0n1p1 259 : 1 0 20G 0 part /
└─nvme0n1p128 259 : 2 0 1M 0 part
Note how the partition at 259:1 is only 20GB, while the entire disk at 259:0 is 40GB. A partition resize is required in this case.
1
2
3
4
5
6
7
8
9
10
11
12
13
14
15
16
17
18
19
20
21
22
23
24
25
26
27
28
29
30
# sudo growpart /dev/nvme0n1 1
CHANGED : partition = 1 start = 4096 old : size = 41938911 end = 41943007 new : size = 83881951 end = 83886047
# lsblk
NAME MAJ : MIN RM SIZE RO TYPE MOUNTPOINT
nvme0n1 259 : 0 0 40G 0 disk
├─nvme0n1p1 259 : 1 0 40G 0 part /
└─nvme0n1p128 259 : 2 0 1M 0 part
# df -hT
Filesystem Type Size Used Avail Use % Mounted on
/ dev / nvme0n1p1 xfs 20G 2.8G 18G 14 % /
# sudo xfs_growfs -d /
meta - data = / dev / nvme0n1p1 isize = 512 agcount = 11 , agsize = 524159 blks
= sectsz = 512 attr = 2 , projid32bit = 1
= crc = 1 finobt = 1 spinodes = 0
data = bsize = 4096 blocks = 5242363 , imaxpct = 25
= sunit = 0 swidth = 0 blks
naming = version 2 bsize = 4096 ascii - ci = 0 ftype = 1
log = internal bsize = 4096 blocks = 2560 , version = 2
= sectsz = 512 sunit = 0 blks , lazy - count = 1
realtime = none extsz = 4096 blocks = 0 , rtextents = 0
data blocks changed from 5242363 to 10485243
# df -hT
/ dev / nvme0n1p1 xfs 40G 2.8G 38G 7 % /
If the XFS tools are not already installed , you can install them as follows :
sudo yum install xfsprogs
For an EXT4 filesystem, use the resize2fs command instead:
sudo resize2fs / dev / nvme0n1p1
For more information, please visit the AWS Docs: https://docs.aws.amazon.com/AWSEC2/latest/UserGuide/recognize-expanded-volume-linux.html
How-To's , Technology Tags: Amazon , Amazon Linux 2 , AWS , df , df -hT , Disk , EBS , Expand , Filesystem , Grow , howto , Linux , Linux2 , lsblk , NVMe , partition , Resize , tips , volume , XFS No comments
Author:
erics , Posted on Tuesday, April 11th, 2023 at 6:31:31pm
PROBLEM:
I was seeing the following error when trying to do a plugin update, and an error in my WordPress logs:
[Tue Apr 11 22:12:01.373709 2023] [proxy_fcgi:error] [pid 26878] (70007)The timeout specified has expired: [client 200.10.125.161:55460] AH01075: Error dispatching request to : (polling), referer: https://www.demo.org/wp-admin/plugins.php?plugin_status=upgrade
and getting variations of any of the following strings:
SOLUTION:
vi / etc / httpd / conf . d / php . conf
ADD :
< Proxy "unix:/run/php-fpm/www.sock|fcgi://localhost" >
ProxySet connectiontimeout = 1200 TimeOut = 1200
< / Proxy >
vi / etc / httpd / conf . modules . d / 00 - proxy_timeout . conf
Timeout 1200
ProxyTimeout 1200
systemctl restart php - fpm
systemctl restart httpd ~ OR ~ apachectl configtest ; apachectl restart
How-To's , Technology Tags: 00-proxy_timeout.conf , 504 , 504 ERROR , 504 Gateway Timeout , apache , fcgid.conf , Gateway Timeout , Gateway Timeout (504) , Gateway Timeout Error , howto , HTTP 504 , HTTP Error 504 – Gateway Timeout , Performance , php-fpm , Restart , Speed , systemctl , Timeout , tips , tuning No comments
Author:
erics , Posted on Tuesday, April 11th, 2023 at 10:09:00am
How-To's , Technology Tags: Display , git , git tag , howto , List , Message , Show , Tag , tips No comments
Author:
erics , Posted on Friday, February 24th, 2023 at 12:29:58pm
SSH login from older hosts running OS X Yosemite 10.10.5 to macOS Ventura 13.2.1 was not working.
SSH failed with a “No hostkey alg” error.
To correct the problem, I added the following two lines to the bottom of BOTH /etc/ssh/ssh_config and /etc/ssh/sshd_config on the Ventura side:
HostKeyAlgorithms + ssh - rsa , ssh - dss
PubkeyAcceptedKeyTypes + ssh - rsa , ssh - dss
Be sure to stop and start Remote Login under System Settings -> General -> Sharing
How-To's , Technology Tags: dss , HostKeyAlgorithms , howto , MacOS , PubkeyAcceptedKeyTypes , RSA , ssh , ssh-dss , ssh-rsa , sshd , sshd_config , tips , Ventura , Yosemite No comments
Author:
erics , Posted on Thursday, January 19th, 2023 at 7:38:38pm
Death , Entertainment , Technology Tags: crosby , david , david crosby , death , Rip No comments
Author:
erics , Posted on Friday, December 30th, 2022 at 11:46:21am
Summary
Use AWS CloudTrail as the basis for a simple Intrusion Detection System to monitor your AWS account for unwanted activity.
Background
While I follow best practices for security, it is always possible that a bad actor could obtain my credentials and gain access to my AWS account.
Once access is gained, such criminals could launch new, maximum-sized instances all over the world and proceed to harness them for nefarious purposes, often for DDoS attacks and crypto-mining.
These instances can accrue enormous charges in a short time given the cost per instance times the quantity launched.
Attacks like this can cripple an organization financially, especially because Amazon Web Services are NOT flexible about refunding such charges if they happen more than once.
AWS-based Solutions
AWS itself offers a number of paid services to assist with account security, including CloudWatch and Trusted Advisor.
While they are no doubt excellent offerings, I was reluctant to pay more than I had to, and the CloudWatch tool seemed like overkill in terms of complexity.
Chosen Solution
While CloudWatch did not work for me, the underlying CloudTrail service in fact was the answer, when used with the aws command-line tool to query the associated event data periodically via cron for non-Read-Only events.
This solution required me to roll my own tool (in Perl) to interpret the data and alert via email under the desired circumstances.
Solution Steps
Make sure you have the latest AWS CLI tool installed, Instructions are here: https://docs.aws.amazon.com/cli/latest/userguide/getting-started-install.html
Create a new Trail in the AWS CloudTrail console.
Use the aws CLI tool to query non-Read-Only events as JSON
Look through the provided events to see if any are dangerous.
Create a wrapper script and call via cron to check cloudtrail once per minute
Anyone that wants the complete script, please contact me at bloghelp@thewyz.net for more information.
Example CLI Call
export REGION = 'us-east-1'
export START = '2022-12-30T00:00:00Z'
/ usr / local / bin / aws cloudtrail lookup - events -- region $ REGION -- lookup - attributes AttributeKey = ReadOnly , AttributeValue = false -- output json -- start - time $ START
Example Crontab Entry
* * * * * / Users / wyzaerd / bin / trailwatch - c 2 > & 1 >> / Users / wyzaerd / logs / trailwatch . log
Example Parsing Logic (Perl)
1
2
3
4
5
6
7
8
9
10
11
12
13
14
15
16
17
18
19
20
21
22
23
24
25
26
27
28
29
30
31
32
33
34
35
36
37
38
39
40
41
42
43
44
45
46
47
48
49
50
51
52
53
54
55
56
57
58
##################################################
my @ data = (
$ region ,
$ sourceIPAddress ,
$ eventName ,
$ accessKeyId ,
$ userName ,
$ eventTime
) ;
##################################################
## source IP rules
##################################################
if ( $ sourceIPAddress eq $ homeIPAddress ) {
## HOME IP
$ msg = & :: makeMsg ( 'HOME' , \ @ data ) ;
} elsif (
$ sourceIPAddress eq 'ec2.amazonaws.com'
or
$ sourceIPAddress eq 'guardduty.amazonaws.com'
) {
## AWS MGMT CALL
$ msg = & :: makeMsg ( 'GOOD' , \ @ data ) ;
} elsif (
$ sourceIPAddress eq 'ssm.amazonaws.com'
or
$ sourceIPAddress eq 'workmail.amazonaws.com'
) {
## AWS MGMT CALL
$ msg = & :: makeMsg ( 'WARNING' , \ @ data ) ;
## I choose to not actually warn for these,
## so the next line is commented out:
##$warnings{$TrailEventID} = $msg;
##################################################
## source IP did NOT match any rules - check user
##################################################
} else {
if ( $ userName eq 'myBackupUser' ) {
## BACKUP USER "myBackupUser"
$ msg = & :: makeMsg ( 'BACKUP' , \ @ data ) ;
$ warnings { $ TrailEventID } = $ msg ;
##################################################
} else {
my $ userName = (
defined ( $ CloudTrailEvent -> { userIdentity } -> { userName } )
and $ CloudTrailEvent -> { userIdentity } -> { userName }
) ? $ CloudTrailEvent -> { userIdentity } -> { userName } : '' ;
$ msg = & :: makeMsg ( 'BAD' , \ @ data ) ;
$ errors { $ TrailEventID } = $ msg ;
}
} ## end if
List of AWS Regions
ap-south-1
Technology Tags: Attack , AWS , Bad Actor , Cloud , CloudTrail , CloudWatch , Compromise , Crypto , DDOS , Detection , dos , howto , IDS , Intrusion , Intrusion Detection , Mining , tips , Vector No comments
Author:
erics , Posted on Wednesday, December 7th, 2022 at 2:52:03pm
Tungsten Clustering depends on a number of prerequisites and best practices to function optimally. In this blog post, we explore a critical, yet easily-overlooked step when installing a Tungsten Cluster node - setting up start at boot, ideally under `systemd` control.
Syndicated Post Tags: Comments Off on Tungsten Clustering: Plugging the Holes – Risk Mitigation Through Best Practices
 erics, Posted on Tuesday, May 9th, 2023 at 9:55:13am
 Categories: How-To's, Technology AWS, denied, ed25519, Error, Generate, howto, key, Linux, MacOS, Permission Denied, public, Public Key, ssh, ssh-keygen, sshd, tips, Ventura |
  No comments
  First click on System Settings